Saving and Scheduling
Save filtered views of interactions for quick access and schedule automated exports to share with your team.

Saving Explore views
Section titled “Saving Explore views”Save your current filter and column configuration as a reusable view.
Creating a new view
Section titled “Creating a new view”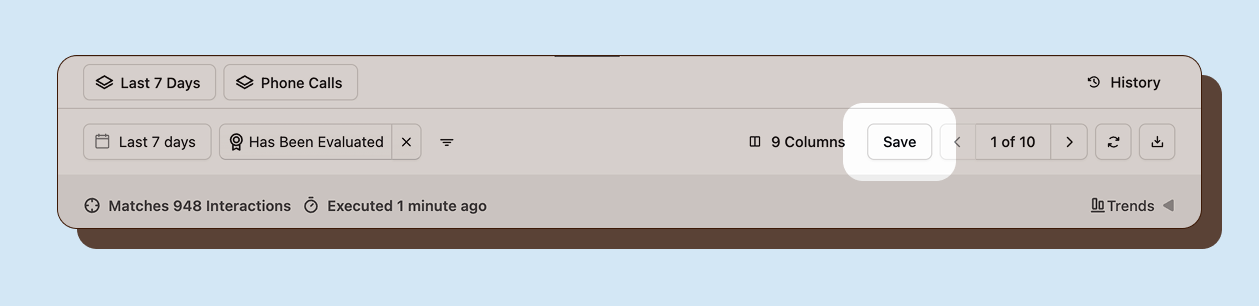
When you modify filters, columns, or the date range in Explore, the view becomes “dirty” (unsaved changes). A Save button appears in the toolbar.
To save a new view:
- Apply your desired filters and configure columns.
- Click the Save button in the toolbar.
- A form appears below the toolbar.
- Enter a Name for the view (required).
- Add an optional Description.
- Click Save.
Your new view appears as a tab below the main navigation, alongside the default “Last 7 Days” view.
View tabs
Section titled “View tabs”Saved views appear as tabs below the navigation bar:
- Last 7 Days: The default view showing interactions from the past week
- Your saved views: Custom views you have created
Click any tab to load that view’s filters and column configuration.
Editing saved views
Section titled “Editing saved views”For views you own, you can edit the name and description inline:
- Open the saved view.
- Click on the view name or description text.
- Type your changes.
- Press Enter or click elsewhere to save.
To update the view’s filters or columns:
- Make your changes to filters or columns.
- Click the Save button that appears.
- The view updates with your new configuration.
Deleting views
Section titled “Deleting views”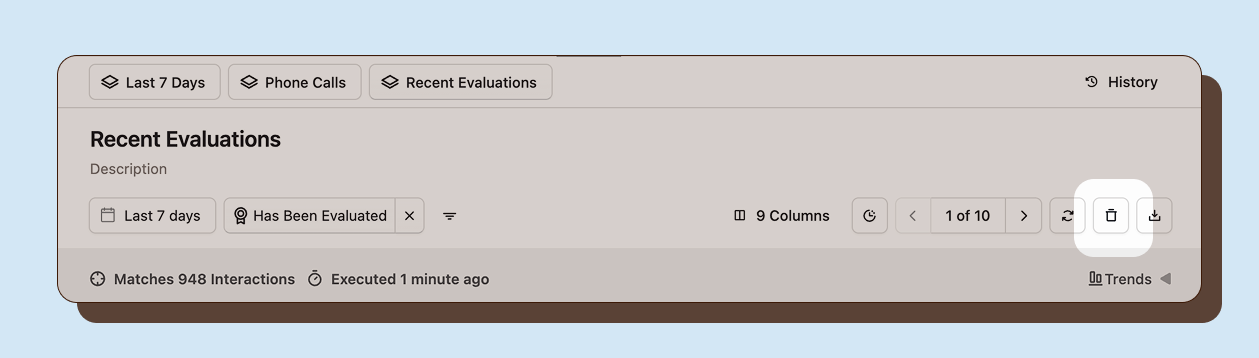
To remove a view you created:
- Open the saved view.
- Click the Trash icon in the toolbar.
- Confirm the deletion in the dialog that appears.
Deleted views are removed immediately and cannot be recovered.
Scheduling exports
Section titled “Scheduling exports”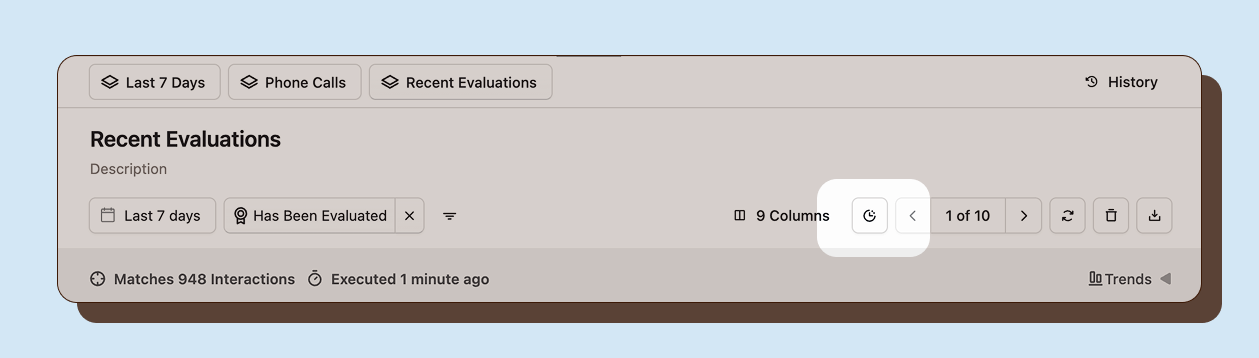
Schedule automated exports of saved views to email recipients on a recurring basis.
Note: Scheduling is only available for saved views. Save your view first before setting up a schedule.
Configuring the scheduler
Section titled “Configuring the scheduler”- Open a saved view you own.
- Click the Clock icon in the toolbar.
- The scheduler dialog opens.
The clock icon shows a tooltip with the next scheduled run time if a schedule is active.
Frequency
Choose how often to send the report:
- Daily: Every day at the specified time
- Weekly: Once per week on the selected day
Day (Weekly only)
Select the day of the week for weekly reports:
- Monday through Sunday
Time
Select the time of day to send the report. Times are available in 30-minute increments from 12:00 AM to 11:30 PM.
Timezone
Select the timezone for the schedule. The default is your local timezone.
Schedule reports for times when recipients are likely to review them, such as early morning for daily reports.
Recipients
Enter email addresses separated by commas. All recipients receive the same export file.
Output format
Choose the export format:
- CSV: Spreadsheet format compatible with Excel and other tools
- JSON: Structured data format for programmatic use
Enable scheduler
Toggle the Enable scheduler switch to activate or pause the schedule:
- On: Reports send automatically on the schedule
- Off: Schedule is paused, no reports are sent
Editing a schedule
Section titled “Editing a schedule”To modify an existing schedule:
- Open the saved view.
- Click the Clock icon.
- The scheduler dialog opens with current settings.
- Make your changes.
- Click Save.
Changes apply to the next scheduled run.
Pausing a schedule
Section titled “Pausing a schedule”To temporarily stop scheduled exports:
- Open the saved view.
- Click the Clock icon.
- Toggle Enable scheduler to Off.
- Click Save.
The schedule is paused but your settings are preserved. Toggle back to On to resume.
Viewing next run time
Section titled “Viewing next run time”Hover over the Clock icon to see when the next export will run. The tooltip shows:
- “Schedule export” if no schedule is set
- “Next run: [time]” if a schedule is active
Examples:
- “Next run: Today at 9:00 AM”
- “Next run: Tomorrow at 8:30 AM”
- “Next run: Monday at 9:00 AM”